How to fix incrementing mount names on reboot in Ubuntu/Linux Mint
TL;DR
To prevent your internet disks from being mounted with incrementing names (e.g., name1, name2) on each reboot, configure static mount points using the /etc/fstab file. This avoids conflicts with services like Docker that use bind volumes.
Context
Each time I restarted my computer running Ubuntu/Linux Mint, my additional disks were mounted with incrementing names. This breaks all symbolic links and history because another service, Docker in my case, uses the path before it is mounted.
Why was this happening? I did not care to check how were the additional internal disks being mounted. I just connected them and started to use them. To be fair, I don't restart my computer that often (around once a year, see the image below), so it took me almost a year to find this situation.

Long story short, I restarted my computer and many thing did not work anymore, and the mount points were the cause of it.
Steps to Fix the Issue
1. Find the UUID of the Disk
Use the lsblk command to list all block devices and their UUIDs:
lsblk -o NAME,FSTYPE,UUID
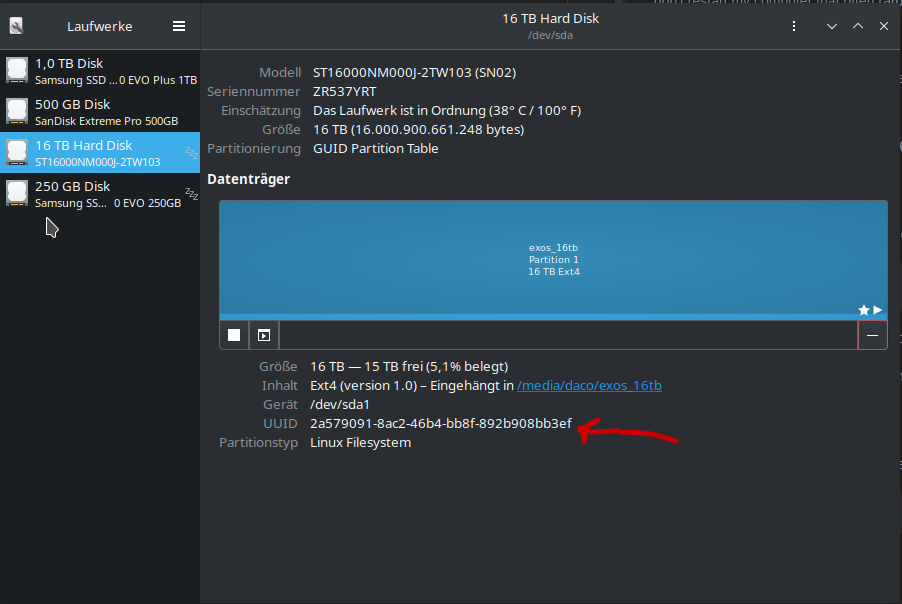
You can also use the disk manager in your desktop environment to find the UUID. In my case, KDE, it looks like this:

Note down the UUID of the disk you want to mount.
2. Edit /etc/fstab
Open the /etc/fstab file with a text editor:
sudo nano /etc/fstab
3. Add an Entry for Your Disk
Add an entry for your disk using its UUID:
UUID=<your-uuid> /mnt/your-mount-point ext4 defaults 0 2
Replace <your-uuid> with the actual UUID and /mnt/your-mount-point with your desired mount point.
4. Understand the fstab Options (optional, most of the time the defaults will work)
-
defaultsoption: A shorthand for standard mount options, including: -
rw(read-write) -
suid(allow setuid bits) -
dev(interpret device files) -
exec(allow execution of binaries) -
auto(can be mounted withmount -a) -
nouser(only root can mount) -
async(asynchronous I/O) -
0(dump): This field is used by the dump utility to decide if the filesystem needs to be dumped.0means ignore. -
2(pass): The order in whichfsckchecks the filesystem for errors during boot.0means don't check,1is reserved for the root filesystem, and2is for all other filesystems.
5. Create Mount Points
If you don't have the mount points already, create them:
sudo mkdir -p /mnt/your-mount-point
In my case I did already have them.
6. Mount the Drives
Restart your computer or run the following command to mount the drives immediately:
sudo mount -a
In my case I had to restart the system, as that was the easiest way to get everything normal again.
Side notes
As sidenote, some of the issues I had were:
- Nextcloud Desktop could not sync anymore, as it did not find the destination folder.
- The quick accesses on doplhin file manager were no longer correct.
- all my zoxide paths were broken.
That was enough for me to fix this, as I couldn't take it anymore. :)
