Use the Include directive to include an external config file in the main
(default) ssh config file.
Create another config file as usual.
Add the following line at the beginning of your ~/.ssh/config
for example, if we have a config file in ~/Documents/.ssh/config add
Include ~/Documents/.ssh/config in your main ~/.ssh/config
A quick note on how to use multiple SSH Keys (Identities) on one machine.
A short note on the use case
Why would you want to use multiple keys on a machine you ask? There are
several reasons, one being perceived security and another being convenience.
Using just one Identity makes everything easier and you don’t have to manage
several Identities You can read more
here and
here.
My use case would be that of convenience. I just want to separate work from
personal projects and I would like to use a separate key (nonwork related)
with those projects
This public key can be in any path, not just in ~/.ssh/ as default/
recommended.
For security, it is recommended that you assign a unique password to this key.
Add all the keys to your cached keys
ssh-add path-to-key
For example, if you have your new key in ~/Documents/ssh_keys/new_key you
would need to run ssh-add ~/Documents/ssh_keys/new_key. If you assigned a
password in Setup 1, you will be asked for it.
Step 3: Update/ Create your ssh config
nano ~/.ssh/config
If you already have entries in your ssh config, just add a new entry at the
end of the file. If your file is empty, or you didn’t have any before, just add
the following.
Host gitlab-diego
    HostName gitlab.com # or github.com or any other domain
    User your-username # usually the one you use with that domain
    IdentityFile path-to-key
With the example data for GitLab and user diego this entry would look like
the following:
Host gitlab-diego
    HostName gitlab.com
    User diego
    IdentityFile ~/Documents/ssh_keys/new_key
To save and close just press Ctrl + o and enter
To exit nano press Ctrl + x.
Step 4: Add the key to GitLab, GitHub or other services
In my case, I wanted to use the new key with GitLab. They have great
instructions on how to do that
but, for convenience, I list the steps here:
I needed to find all the files that matched a regular expression. In this case
all the files that had either 300x200 or 400x220 and where either png or
jpg files.
You can do that pretty easily in BASH using find but the more file types and
conditions the longer the command.
For example the following would be used to find all PNG and JPG files in /tmp
folder:
find/tmp-name'*.png'-or-name'*.jpg'
Enter regular expressions :)
Important : the find command in macOS and in GNU/Linux (Ubuntu,
Debian, etc..) are slightly different and not all syntax can be used between
systems.
It’s a really useful magic but really hard to learn.
What is a regular expression?
A regular expression is a special text string for describing a search
pattern. You can think of regular expressions as wildcards on steroids. You
are probably familiar with wildcard notations such as *.txt to find all
text files in a file manager. The regex equivalent is .*\.txt.
-regexbuddy
Those commands will find all the files of the type something-300x200.jpg or
somethingelse400x220.png
So now you see a pattern. You can use the same regular expression on macOS and
Linux (the part between ') if you change the syntax and add a $ at the
end in the case of Linux.
Here are some useful regular expression you may want to know.
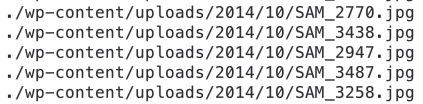
Find all the png and jpg files with SAM somewhere in the filename
.*(SAM).*\.(jpg|png)
This would find, among others, the following files
result of running the find command with '. (SAM)..(jpg|png)'
xargs is a command on Unix and most Unix-like operating systems used to
build and execute commands from standard input. It converts input from
standard input into arguments to a command.
-Wikipedia
It’s great to be able to find all those files, but you should be able to do
something with them once you have found them, right?
That’s where xargs comes in. Let’s say you would like to remove all the JPG
and PNG files that have SAM in the filename.
That was easy, right? And it’s really handy to be able to delete some files
from all folders. For example all the automatically-made thumbnails on Wordpress and other systems. Let’s say you have to clean a folder with several
sub-folders and only leave the original files. On a Mac you can do this (add
or remove other resolutions) and remove all the files with a resolution in
their name (for example something-AAAxBBB.jpg
After I had access to my Ubuntu Server through SSH, the next logical step (at
least for me) was to enable Jupyter Notebooks running inside TORUS (Docker) to
be reachable from a remote browser. That way I’m able to run python code on
the server while using my browser as if it was locally installed. To run
ngrok for a http port forward is fast and easy, even remotely through SSH,
but before that let’s talk about screen
What is screen?
GNU Screen is a terminal multiplexer, a software application that can be
used to multiplex several virtual consoles, allowing a user to access
multiple separate login sessions inside a single terminal window, or detach
and reattach sessions from a terminal.
-Wikipedia
It is one of those tools you will love once you know them. screen lets you
“open multiple windows” in your terminal (SSH included). You can run multiple
commands and, if connected through SSH, keep running and get back to them even
if the connection gets down. To install screen just open a terminal and type
sudo apt-get install screen -y
ngrok and screen
Once you have screen installed lets use ngrok to open a tunnel to your Jupyter
instance inside TORUS.
1. SSH into your server2. Open screen and assign a name
screen -S ngrok_jupyter`
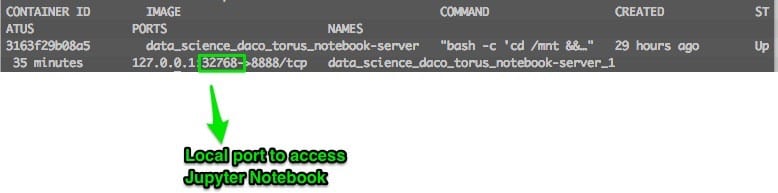
3. Identify on which port is Jupyter Notebooks running
docker ps
4. Start ngrok on that port
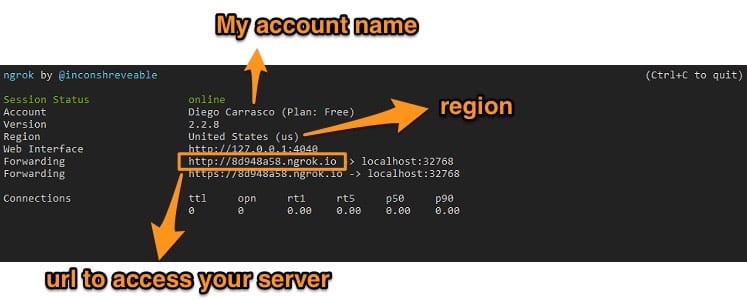
ngrok http 32768
This will open ngrok with information on that connection, and you will see the following on your screen. If you access the URL you will open Jupyter Notebooks from anywhere.
5. Now lets use screen
Now you can press crtl + a and then d to leave (detach) screen.
ngrok will still be running. If your SSH connection goes down, ngrok will still be running.
6. To reconnect to (attach) screen and stop ngrok type
screen -r ngrok_jupyter
and press ctrl + c. This will interrupt ngrok
You should also know that
If the server connection gets down, you won’t be able to access it unless you are in front of it (physically).
You can use the same steps to forward any port from your local server to a public ngrok url. For example, a web server (apache2 or nginx), a custom app, a python server and so on. You only need to know the port on which you can access it locally and then write in when running ngrok
ngrok http PORT
If you don’t want to use screen, you can append & at the end of the command to run it in the background.
If you don’t use screen nor append & your ngrok forward will stop if your SSH connection goes down.
You can also run ngrok locally. No need to use SSH if you are in front of the server.
More than 10 years ago I switched to a Mac and never looked back (I still use
Debian and/or Ubuntu for servers though, apt is the best!)… until now. For
several reasons I’ve been dealing with windows for the last month on a daily
basis and I’ve to say I miss the terminal so much! In MacOS I use
iTerm2 for terminal emulator and
brew and brew cask for app install and I love it and going back to Windows CMD and the
whole click-click-click install is not what I would like. And I miss linux-
like commands so much! Fortunately I found cmder and
it’s working like a charm (it even has support for common unix-like commands
like ls , cat and nano . That plus chocolatey
is making my life so much easier! Think of chocolatey like brew for Mac or
apt for Debian-based linux. Is so much better to search an app in a
repository and install it from the command line than to open the browser,
search for the website, find the download link, download the file, open the
file, click all the buttons and repeat for each app you want. With cmder and
chocolatey you have to (once both are installed):
To search for an app
choco search name_of_app
To install an app
choco install name_of_app
How to install cmder and chocolatey
To get both tools working just follow this steps:
Open an administrator cmd and paste the following to install chocolatey
I have a server at home running Ubuntu 18.04 LTS (normal local network, behind
a router with firewall activated, no DMZ) and I wanted to be able to access it
though ssh. You can think of it as a TeamViewer alternative for port
redirection.
What’s SSH?
Secure Shell (SSH) is a cryptographic network protocol for operating network
services securely over an unsecured network. Typical applications include
remote command-line login and remote command execution, but any network
service can be secured with SSH.
-Wikipedia
Public URLs for exposing your local web server. Spend more time programming.
One command for an instant, secure URL to your localhost server through any
NAT or firewall.
They weren’t kidding. To set it up do the following:
Follow the steps on their “Getting started page”. There are 4 steps to follow. If you are in Ubuntu just run the following in the terminal to install. Both methods work just fine.
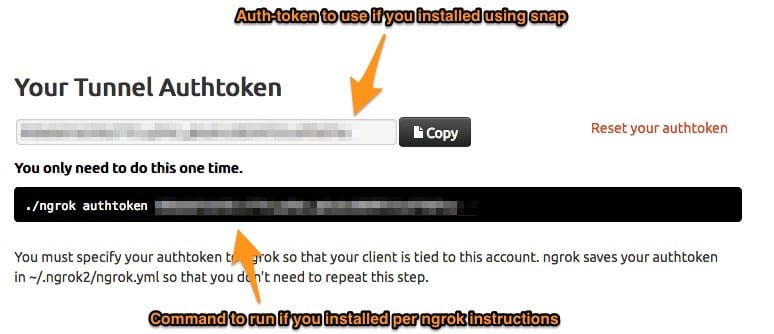
3. Start ngrok on your ssh port. You can read more here
./ngrok tcp 22
4. Access your server with ssh
sshYOUR_USER@0.tcp.ngrok.io-pPORT
Where PORT is the port assigned by ngrok and YOUR_USER is your user in the server. You can also check the port assigned at your ngrok dashboard
Optional: copy your ssh key to your server for a password-less access
I use ssh-copy-id as follows
ssh-copy-id -p port -v 0.tcp.eu.ngrok.io -l user
You can read more about it here On Ubuntu
ssh-copy-id is already installed. On Mac just run
brew install ssh-copy-id
For more details about brew, read here. In a few words, think of brew as a package manager for Mac (like snap, apt, rpm, etc…). If you just want to get it installed open a terminal window and run
Important : since 2019-12 Tors is deprecated as stated in their GitHub
Repository:
This project is deprecated and has been archived. A new, significantly
improved, cookiecutter for Dockerized machine learning and data science can
be found here: https://github.com/manifoldai/orbyter-cookiecutter.
I leave the original post just as a reference.---
Original post:
I needed a faster, always-on computer and more storage and got a no-so-old
(okay, it's old but has 4 cores and a 2 TB HD) HP Proliant ML110 with Ubuntu
Linux LTS 18.04. I installed everything on my Mac, and doing it all over again
made no sense. Not only that, but I also tried Anaconda (also a great tool to start, but you still
have to install several packages on every new install). Then I found Torus: A
Toolkit For Docker-First Data Science which you can download
here or just
read further.
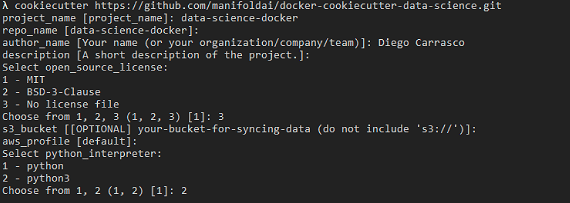
Torus and Cookiecutter
Using the project cookiecutter and Docker image together you can go from
cold-steel to a new project working in a Jupyter notebook with all the
common libraries available to you in less than five minutes (and you didn’t
have to pip install anything) -Alex Ng
Cookiecutter Data Science
A logical, reasonably standardized, but flexible project structure for doing
and sharing data science work. -from its repository
Helping Data Science teams easily move to a Docker-first development
workflow to iterate and deliver projects faster and more reliably. The Torus
1.0 package contains a Python cookiecutter template and a public Docker
image. The goal of Torus is to help data science teams adopt Docker and
apply Development Operations (DevOps) best practices to streamline machine
learning delivery pipelines. -From their website
In other words, install Torus and everything will be already working for you
(pandas, Jupyter Notebook, sklearn, matplotlib, etc…). Should you want any
package not included, you can always install it. The docker image provided is
running Ubuntu, so there’s plenty of information out there. You can also
install packages directly from Jupiter Notebooks using pip, which is
recommended to have reproducible code. Also, you will find the data (files and
folders) in data in your project’s folder. The docker image mounts this
folder as a local folder inside Torus as /mnt, and thus you can use your
normal tools (for example Sublime Text on my Mac) to edit files with are later
run inside Torus. You can also access Jupiter Notebooks from your browser.
How to install Torus and Docker
These are the steps to prepare the system for Data Science stuffs by installing
Torus. Open your terminal and follow these steps: 1. Download Docker CE and
Python PIP (this assumes you already have python installed. That’s the
default btw.).
Get the port on which Torus is running to access Jupyter Notebooks and get the name of the container.
dockerps
Docker uses resources, so your computer should be slower and may heat (depends on the computer). If you are not using TORUS remember to stop the container.
dockerstop<name-of-the-container>
Tip: if you write “docker stop “ and the first letter of the name of the
container and press tab, it will fill the rest with the name
You can start the container with
dockerstart<name-of-the-container>
Remember to check in which port it’s available after starting. The port might change
Get the port on which Torus is running to access Jupyter Notebooks and get the name of the container.
dockerps
Get a bash shell in the container. Replace
dockerexec-it<containername>/bin/bash
once in the bash shell, you can add a user (not a good idea to be always logged in as root
Clustering cities with more than 100,000 inhabitants in Germany and Chile
based on their infrastructure (Foursquare venues)
The final result of the analysis is an interactive map with the cities from
both countries plotted in the color of each cluster. You can zoom in and out
and click the point to check the cluster and name of each city.
Notes from IBM Data Science Professional Certificate course by IBM on
Coursera__Notes by Diego Carrasco G.
I’m starting a small series of articles regarding Data Science, what enticed me, why I started, where to start and so on. I’m as of now by no way an expert but an enthusiastic learner who’s writing to learn better, share what I’ve learned and as an introduction and basis for others who would want to start in this area. Right now I’m on an IBM Course on Coursera which I find to be really great (and so far from all the courses I’ve tried to take on Coursera the IBM ones are the only ones I’ve finished, and quickly may I add.)
I finished 7 courses from the IBM Data Science Professional Certificate, and I'm on the 6th week of the 8th one. It was the best trial ever (7 days, 6 IBM/Coursera Certificates and 6 IBM Badges by youracclaim.com) Honestly, I couldn't recommend this set of courses enough. It's really quite a good basis to start in Data Science and Python. And it all began because I wanted to invest in Real Estate and wanted to have a Data Science base of all the freely available property ads in Chile using "www.yapo.cl" (its only accessible if you are in Chile, but a VPN works like a charm). I wrote a Python Script fast to scrap the data (15k rows up today for the last 6 months) using requests and
bs4. That got me started, but Excel took quite a lot of time to render the data and I still had to clean it up a bit more. I had read about python, pandas and so on and searched how to use those tools, and I stumped right into Coursera and this Professional Certificate. I also looked in EDX, class-central and many others, but this one gave me a certificate (always good), the Data Analysis with Python was enjoyable and fast-paced, and I finished it in a couple of days, leaving me quite excited for more. I realized I like this area and started the other courses right away, and I’m now on the 8th course on
Machine Learning with Python (it’s harder that the others, and it’s taking more time to finish it, but I’m excited about the possibilities and astonished as to how many tools and models are available. Pandas is also quite a useful discovery for me, and I’m loving it).
I’ve taken lots of notes (by hand, hence the picture above) and I’ll be re-writing them in this site. Maybe they are helpful for others. While I’m working on the Capstone Project I was in need of a way to get a DataFrame of venues near a coordinate using Foursquare API, so I developed a small package in python and published it to GitHub. You are free to check it out and play with it. Any recommendations are welcome, it’s my first package after all. And it’s under the MIT License, so enjoy. You can check that project on GitHub and check a small post
on that project here
Important: I do not use this anymore and is not being maintained. This post is here just as reference.
I’m working on my Capstone project for the IBM Data Science Professional
Certificate Specialization on Coursera and wanted a fast and easy way to get
venues around some coordinates. The way the explained in the course is fine,
but I would like to have the data into a DataFrame ready to use.
I found https://pypi.python.org/pypi/foursquare/() which works fantastic,
but still had to clean the result, thus this.
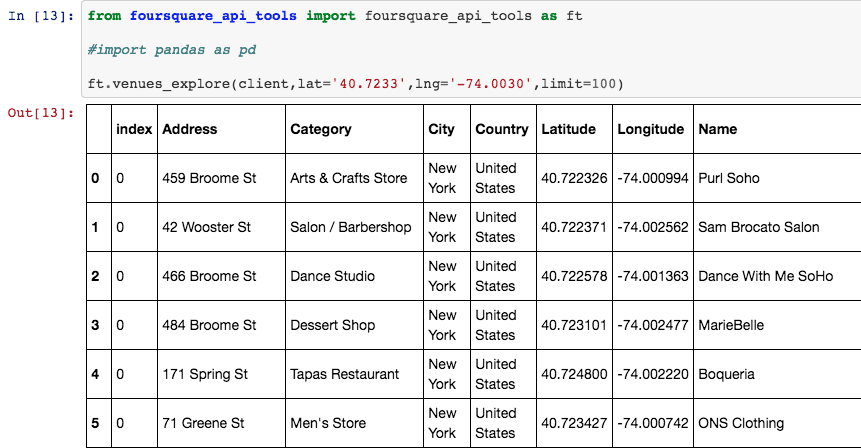
I developed a small package called foursquare_api_tools that returns the
venues in a dataframe with several columns. You can check the package in
GitHub
You can use it in Jupyter Notebooks without problems. I tested it in IBM
Cloud and
https://labs.cognitiveclass.ai
Just install it using !pip install foursquare
Here is an example notebook created on dataplatform.cloud.ibm.com
Example output
Important
This is the first version, and I’m using it for the project, but it can still
have some bugs.
I’ll add more information and details in the future. In the meanwhile you are
welcome to check the code on GitHub.
 If you access the URL you will open Jupyter Notebooks from anywhere.